What is SSH Access and How to Enable It in Your Hosting Account
SSH (Secure Shell) access has become an integral part of modern computing because it allows users to remotely access and manage their systems with enhanced security. It creates a secure and encrypted connection between a user's device and a remote computer, typically a server. If someone tries to intercept the connection, they will only see encrypted and meaningless data that requires decryption. SSH uses advanced encryption techniques that make it extremely challenging for outsiders to decrypt the data.
Shared Servers: Enabling SSH Command from Bluehost Portal
- Log in to your Bluehost Portal.
- In the left-hand menu, click Websites.
- Click the Manage Site button located next to the website you want to manage.

- Navigate to the Files & Access tab in the top menu.

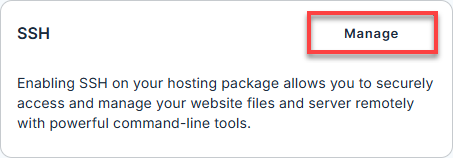
- Locate the SSH section and click Manage.
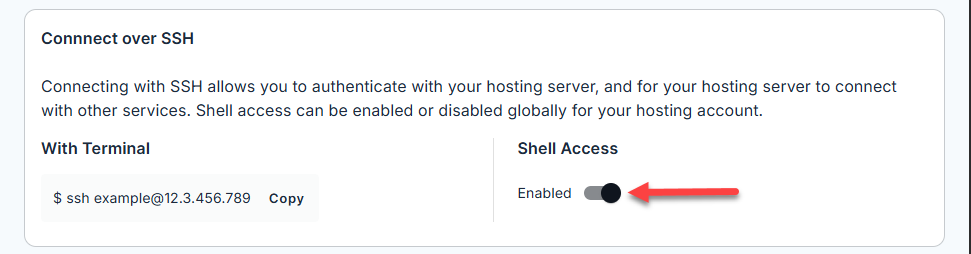
- Go to the Connect over to SSH section and toggle on Shell Access to enable it.
For additional information on using and running SSH commands, please explore the following articles:
VPS and Dedicated Servers: Enabling SSH Command from WHM
- Dedicated and VPS customers automatically have root SSH access. Root shell allows you to change anything on your server.
- If you want to activate SSH on a sub-account (separate cPanel), access WHM with your root login and click the Manage Shell Access link. There, you can enable normal and jailed shells for your clients; port 22 for a normal and jailed shell.
- If you have multiple cPanels that need SSH, you can activate them all within root WHM.
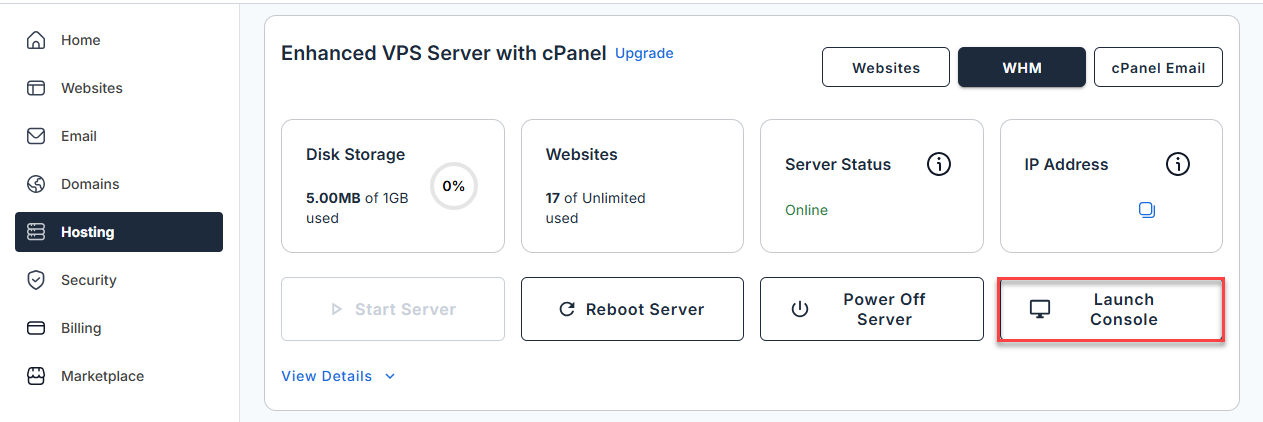
- Option 1: via Console and Option
- Option 2: via SSH using third-party Terminal Programs
How to use SSH Access
Using the directions below, you would use port 22 to connect to the server via SSH and log in with username "root" and your WHM password. If you enable shell access for individual cPanels, the SSH username and password would be the same as the cPanel username and password for those accounts. Root SSH will allow you to access the server processes.
Option 1. Connecting to your server via Web Console for SSH
We offer a Web Console for SSH terminal access, which simplifies the process by only requiring users to know the root username and server password.
Option 2. Connecting to your server via SSH
Windows
To access SSH:
- Download WinSCP or PuTTY.
- Enter your IP address and the appropriate port number.
- Log in with your cPanel username and password.
Linux
- To connect, run the following SSH command from a terminal:
ssh -p 22 [email protected] - Replace cpanelusr with your username and ip.add.re.ss with your IP address.
Mac
- To open the terminal on a Mac, go to Applications → Utilities → Terminal.
- Type in the following SSH command:
ssh -p 2222 [email protected] - Replace cpanelusr with your username and ip.add.re.ss with your IP address.
Summary
SSH (Secure Shell) access is a secure method for remotely managing systems. This provides you with a way to access and control servers over an encrypted connection. This encryption ensures that any intercepted data appears meaningless without decryption. Users can enable SSH access for shared servers through cPanel by generating or importing SSH keys. For VPS and dedicated server customers, root SSH access is automatically available, which offers them complete control over the server. Enabling SSH on individual cPanels within these servers is also possible via WHM. We hope this guide has helped you realize the importance of account verification for security purposes.
If you need further assistance, Bluehost Chat Support is available 24 hours a day, 7days a week while Bluehost Phone Support is available 7 days a week from 7 am-12 midnight EST.
- Chat Support - While on our website, you should see a CHAT bubble in the bottom right-hand corner of the page. Click anywhere on the bubble to begin a chat session.
- Phone Support -
- US: 888-401-4678
- International: +1 801-765-9400
You may also refer to our Knowledge Base articles to help answer common questions and guide you through various setup, configuration, and troubleshooting steps.